|
 n
my book Portraits From Life* (North Light Books,
1999), you will find two portrait demonstrations in
which the procedure is described in 29 steps. I encourage
you to get the book and study this detailed procedure.
The 29 steps are organized into six categories of activity:
the Layout, the Shadows, the Halftones, the Lights,
Restating, and Particularizing. Here I am illustrating
selected steps from each of those activities. n
my book Portraits From Life* (North Light Books,
1999), you will find two portrait demonstrations in
which the procedure is described in 29 steps. I encourage
you to get the book and study this detailed procedure.
The 29 steps are organized into six categories of activity:
the Layout, the Shadows, the Halftones, the Lights,
Restating, and Particularizing. Here I am illustrating
selected steps from each of those activities.
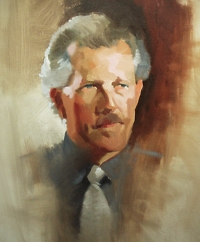
Portrait Study
of Eric Roundy
by John Howard Sanden. |
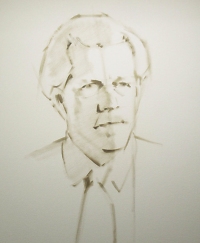
Beginning directly on a white canvas, using a number 4
bristle filbert brush and Portrait Institute Neutral
5, make a simplified drawing of the major forms and
landmarks. The dimensions should be life-size. In an adult
male, the distance from the highest point on the hair
to the bottom of the chin is approximately ten inches.
The first four strokes establish the size and placement.
These strokes are: (1) the top of the head, (2) the bottom
of the chin, (3) the farthest point to the left on the
hair, and (3) the farthest point to the right. |
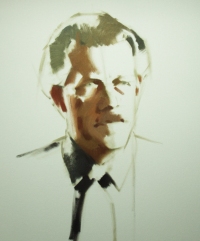
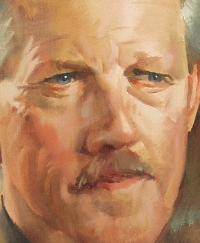
It's traditional in portraiture to paint the shadow tones
first. Shadows establish the solid structure of the head.
Here, my first shadow mixture is Dark 1 with Chromium
Oxide Green added. Darker accents in the shadows are
Dark 2 with Chromium Oxide Green added. The shadow
tones on the hair are Neutral 7 plus black in the
darkest areas and Neutral 7 plus Neutral 5 elsewhere.
The shadow on the collar is Neutral 5 plus Chromium
Oxide Green. |
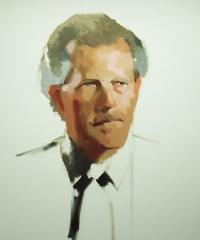
After the darks are in place, the next step is to paint
the transitional halftones - those planes that lie along
or near the darks. The ruddy halftone along the cheekbone
is Halftone 2 plus Venetian Red. The large
areas of warm halftone in the lower third of the face
are Halftone 2 plus Cadmium Red Light, and
then grayed down with Neutral 5. The halftones
on the hair are Neutral 5 plus Yellow Ochre. |
Light 3 is an excellent
starting point for the ruddy pink tones in the central
portion of the face. Light 3 with Cadmium Red Light
added yields beautiful healthy-looking tones. Light
3 plus Venetian Red produces a more subtle shade.
Light 3 plus Alizarin Crimson yields cool pink
highlights. For the coolest pinks, use white and Alizarin
Crimson. In the lower third of the face, the lights
are grayed, with the addition of various colors, such
as Chromium Oxide Green, Cerulean Blue or
Ivory Black. |
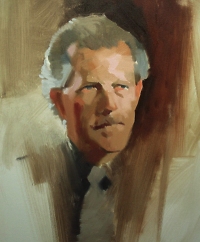
In the Restating step, you go back over the entire painting,
in the same order that you originally painted it, and
restate everything. Starting in the shadows, some are
made darker and more crisp. All of the halftones are restated,
some going darker, some lighter, with the transitions
im-proved. Drawing is corrected with each stroke, and
the painting begins to take on a solid three-dimensional
quality. |
Up until this time. the painting has been proceeding in
general and simplified terms, with the emphasis on tone
and color. Now the emphasis shifts to the particulars
that will make the painting a portrait. The eyes are modeled,
and details are added. The nose is shaped and refined
in terms of its planes, and details added. The moustache
and mouth are given specific details. |
|
|
Finishing touches usually involve refinements in drawing and
detail. The subtle halftones around the mouth are adjusted.
Highlights are reinforced. Details in the necktie are added.
The painting receives the artist's signature.

|